
Using spec-driven development with Claude Code

I no longer write code by hand. I wouldn’t call myself a proper software development engineer by trade, nor have I deployed large-scale software systems. I am a solutions architect and have written mostly prototypes and small-scale applications. Still, those experiences, combined with reading, research, and schooling, have shaped my rudimentary software engineering approaches that I now take to AI tools like Claude Code.
I give this context because I want to say that my build approach isn’t just giving into the vibes. There is a structured approach to documenting requirements, generating specifications, and reviewing the code that is generated. When deploying on AWS, there is design thinking to how resources are organized and deployed based on frequency of change.
As such, I spend a lot of time in the planning phase of the project, rather than jumping right into code generation. Defining and documenting requirements early on leads to better outputs and a less frustrating overall experience. You might say this is true of any software engineering project before AI tools even hit the scene.
That said, the Pandora’s box of AI tools has been opened, and now we need to pump the brakes on vibe coding before we add more tech debt to our backlog. Spec-driven development can act as those brakes, reinforcing good software engineering practices while also taking advantage of the productivity gains from generative AI.
Understanding spec-driven development
When I first started hearing about spec-driven development, I initially wondered if this was just about documenting the requirements first before proceeding with the implementation. Didn’t we already have that all documented in Confluence, which we could then pull in via MCP? However, one also recognizes that even well-documented projects are subject to scope creep, feature divergence, gold plating, and tech debt from quick fixes.
Spec-driven development can help address some of those issues, but it depends on how it is applied. Birgitta Böckeler wrote an excellent blog post that outlines three levels of spec-driven development.
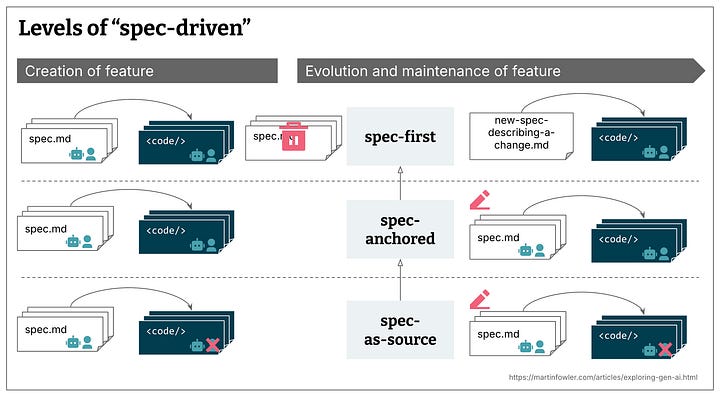
spec-first: well thought-out spec is written first, then used in the AI-assisted development workflow
spec-anchored: spec is kept even after the task is complete, for evolution and maintenance of the respective feature
spec-as-source: spec is the main source file over time, only the spec is edited by the human, human never touches the code
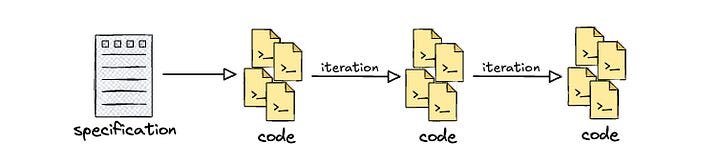
I think my general inclination is mostly toward spec-first approaches. It’s very easy to start by iterating on a singular specification for the project and putting together a great design and implementation plan. It’s equally easy to go off and start implementing, leaving that one specification in the dust, especially as one gets deeper into the project. Perhaps that’s not even spec-first but instead spec-once development.
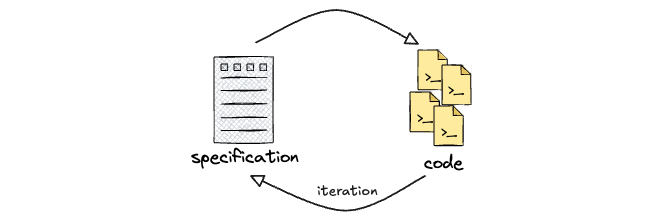
However, I think the value in spec-driven development is the fact that the developer is forced to think deeply about the use case requirements, document architectural considerations, and outline implementation approaches. As depicted in the source diagram, it also indicates that there could be many specification documents for different features. Furthermore, with the latter definitions of spec-driven, it forces the developer to constantly revisit those requirements and feed them back into the specification(s).
Planning and drafting the specification
For concrete practice, I wanted to better understand the nuts and bolts of how an interceptor worked with AgentCore Gateway. While documentation provides examples of input and output payloads with the interceptor function, I wanted to dig in firsthand.

My normal flow for these prototyping endeavors is 1/ to conduct due diligence by reading documentation and other relevant sources, 2/ plan out the resources required for deployment in AWS, and 3/ start building small, testable modules. The research phase happens regardless, but I use those same phases when building out my initial prompt for Claude Code.
1/ I read the CloudFormation documentation to understand the properties and parameters required to configure the relevant resources. I also directed Claude Code to go and ingest the documentation so that it operated on the same context and used the relevant resource properties.
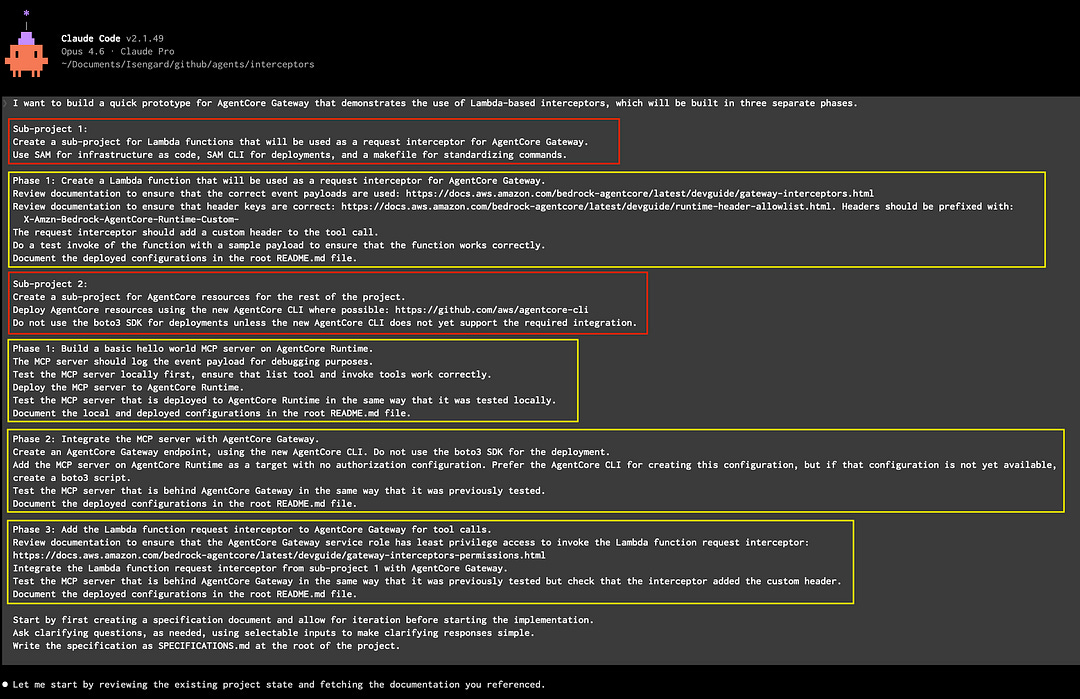
2/ I spent time thinking through how I would build out the stack, considering resource dependencies, modular testing, and overall project flow. As such, I broke the overall project down into two sub-projects (red) with the appropriate phases (yellow) for each sub-project.
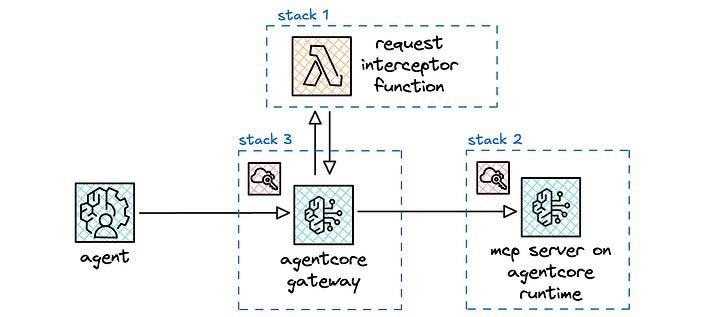
For the first sub-project, I define a single phase (stack 1) for the interceptor. The interceptor is a Lambda function, which gets added to the Gateway resource via the InterceptorConfigurations property. I made this a separate stack so that I could test and iterate using SAM, as I do with all my serverless projects.
For the second sub-project, I define three phases to help me build stepwise. At the top level, I specify that my preference is the new AgentCore CLI, which is currently in public preview and aims to replace the starter toolkit. However, because it is in public preview, it doesn’t yet support all the resources and configurations. In those scenarios, I direct it to not use the boto3 SDK. In retrospect, I should have positively stated that it should then fall back to using CloudFormation. I point to CloudFormation documentation later throughout the instructions.
For the first phase (stack 2), I instruct it to create the MCP server and deploy it on AgentCore Runtime. I instruct it to test locally and then use the same test on the deployed endpoint in AgentCore Runtime.
For the second phase (stack 3), I instruct it to create the AgentCore Gateway resource and set up the MCP server in AgentCore Runtime as the target. I also set up a credential provider configuration to ensure that AgentCore Gateway uses OAuth2 when connecting to the MCP server. I instructed it to test the end-to-end stack to ensure that the integration worked properly.
For the third phase (stack 3 updates), I instruct it to integrate the interceptor at the Gateway, which injects a custom header that gets passed along to the MCP server. I added more logging at this phase, as I wanted to see the headers that were passed throughout the call stack and ultimately returned to the test client.
3/ Lastly, I made sure that there is plenty of iteration in a planning phase, writing all the plans as a specification. I spent time reviewing the specification to ensure that the design, architecture, and implementation plan aligned with my expectations.
Tidbits on working with Claude Code
I found that the default context window of 200k tokens was fine for my purposes. Context windows define how much information can be included in each round trip with Claude. The information includes relevant code, steering documents, available tools with their associated descriptions, data retrieved from tool calls, skills, conversation history, etc. The round trip includes both the input above and the response output.
The default context window limit on paid Claude plans is 200k tokens, which in my experience with the Pro subscription, also applies to Claude Code. The extended context window of 1m tokens is currently available only for users with the Max 20x subscription (womp womp).
What about if I swap from my Pro subscription to using Bedrock directly? I can swap by setting CLAUDE_CODE_USE_BEDROCK=1 before starting up Claude Code. Bedrock has Claude Opus 4.6, Sonnet 4.6, Sonnet 4.5, and Sonnet 4, all of which support 1m token context windows in beta. In order to get access to that extended context window, I need to inject a custom header: "anthropic-beta: context-1m-2025-08-07". However, Claude Code manages interactions with the API and as far as I am aware, there is no way to add the beta flag. Hence, context window of 200k tokens for me it is.
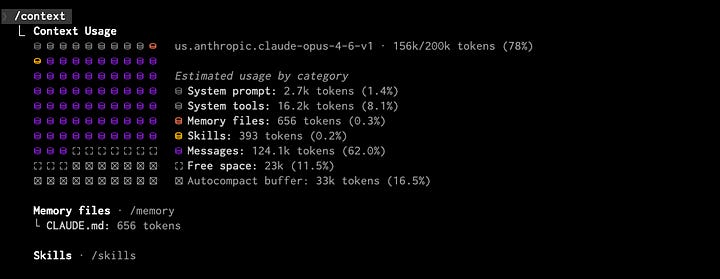
In heavy usage scenarios when I hit that context window limit, Claude Code automatically compacts the conversation history. I found that the compaction process took 3–5 minutes on the low end and 10–12 minutes on the high end.
I observed that Opus hits subscription plan usage limits really fast compared to Sonnet. With subscription plans, the usage limits are defined as the “conversation budget” which determines how many messages you can send. It is influenced by the conversation history, features used, and the chosen model. In my anecdotal experience with the Pro subscription, I ran into sliding window usage limits within 45 minutes to an hour of heavy Opus 4.6 use. When switching over to Sonnet 4.6, I did not hit any usage limits, even after a few hours of heavy usage.
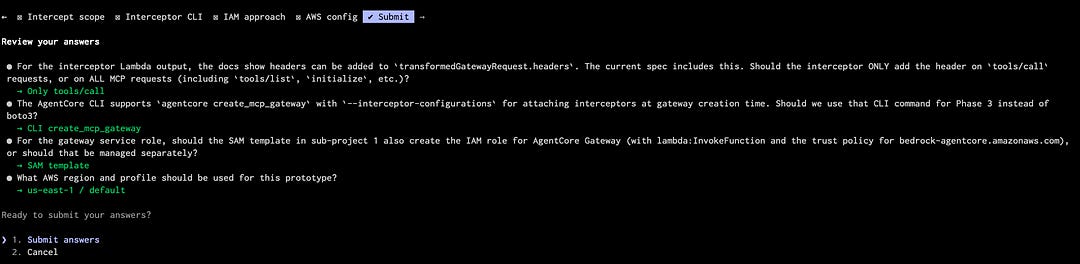
I instruct Claude Code to ask clarifying questions, as needed, but also to use selectable inputs to make clarifying responses simpler. This way, it presents a set of options that I can then navigate via a menu of choices. It leaves the last option for open user input if needed, but I generally found that the presented options are sufficient. This makes the back and forth much easier and faster. At the end, I get a nice summary of the questions that it asked and the selected responses for each question.
I found myself trusting the actions of Claude Code more and more over time. For each action that Claude Code takes, it generally presents three options: 1/ yes, 2/ yes and don’t ask again for [this subset of actions], 3/ no. I initially started by mostly choosing yes and closely observing each action. Over time, I found many actions to be fairly innocuous, especially read-only actions where it was just fetching data. I even found myself auto-allowing writes to code files as I trusted the outputs more. That said, I still haven’t gotten to the point of going full YOLO mode with the--dangerously-skip-permissions flag. I’ll see where I land when I start experimenting with agent teams.
I enjoyed running multiple Claude Code sessions using tmux. I initially did this as I had one session with my subscription plan and two alternate sessions using Bedrock. However, I realized I didn’t need to do that when I saw how easy it was to enable API access and resume the prior session.
/exit
export CLAUDE_CODE_USE_BEDROCK=1
claude --resume <session_id>
Regardless, multiple parallel sessions will be useful when experimenting with agent teams: tmux -CC in iTerm2 for the win!
I ran into this fun little nugget during this project. When Claude Code was trying to research an approach to solving a problem, it used web search to retrieve additional information, and it tried to fetch my own blog post!
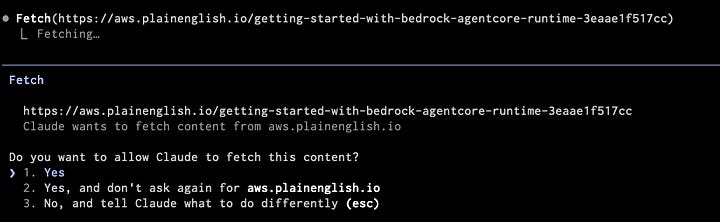
Unfortunately, Claude Code failed to pull the post, as it seems like Medium blocks agents from retrieving content from its platform.
Lessons learned
Time spent in upfront planning pays dividends for implementation efficiency and output quality. In earlier projects, I would write a few quick sentences as part of the initial prompt and get generating as soon as possible. I found myself course correcting a lot and occasionally wondering if I needed to start from scratch. While I didn’t one-shot this project, I found most of my follow-up interactions were small tweaks rather than wholesale changes to the entire project. Furthermore, I frequently took learnings from the project and integrated them into my CLAUDE.md steering document and even ended up creating a SKILL.md at the end of the project. I think custom skills creation will likely be a significant accelerator for future projects.
Build stepwise in small, easily testable chunks. The upfront planning makes it easier to test and correct functionality. This article discusses approaches for building an elite engineering culture. It also covers the use of stacked pull requests, which creates smaller, more easily reviewable pull requests, each of which have dependencies on each other.
Flexibility and workarounds are often required. I really like the new AgentCore CLI. However, as it’s still in public preview at the time of this writing, none of the functionality that I needed for implementation was supported in the new CLI. As such, I ended up going the CloudFormation route. I also found that I couldn’t create credential providers using CloudFormation and had to use boto3 to create it. From there, I was able to inject the provider ARN as a property for the Gateway target.
Build security in sooner than later. Obvious, I know. I added the last layer of OAuth 2 for ingress to the Gateway at the end, and it resulted in having to redeploy the entire stack. I found that the Gateway AuthorizerType property cannot be changed in place and instead requires the resource to be replaced entirely. However, because I had to create the credential provider via boto3 it required a multi-step delete and recreate process. Fortunately, Claude Code handled this with relative ease. However, in enterprise deployment pipelines, this might be a tad bit more painful.
Regularly revisit and update documentation. At each step, if I needed to course correct and tweak the design, I made sure that I updated the specification. While I conjecture that I mainly applied a spec-first approach, I continually revisited the specification and tried to move closer to spec-anchored. It made sure that I stayed grounded, revisiting my original intent and modifying as appropriate.
Conclusion
This space is moving so fast. I have been spending more and more time in Claude Code and figuring out how to use the latest capabilities and techniques. I encourage you to think of your own small project idea and get hands on, regardless of your background, because with these tools, anyone can build.
The frontier keeps charging ahead. I have another bigger project idea in mind, where I aim to apply agent teams for the build. This project likely has far more than I can interactively build, so I want to explore how I might do this with agent teammates to whom I assign issues from a backlog. I plan to document that journey in an upcoming blog post. Stay tuned!
Resources
https://martinfowler.com/articles/exploring-gen-ai/sdd-3-tools.html
https://www.cjroth.com/blog/2026-02-18-building-an-elite-engineering-culture
Note
This article was originally published on Medium.